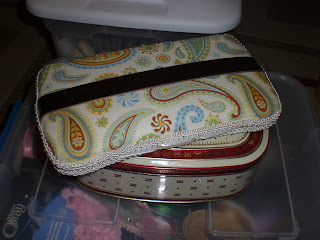
I know these things are all over the blogging world and easy to come by but no crafting blog would be complete without it. The covered wipes case has become increasingly popular and with the help of my friend and cousin Amy, I started making my own a while back. Luckily they aren't as popular here in small town, USA so I can give these as baby shower gifts and most people haven't seen them before.
On Sunday a friend of mine told me she wanted to make one so I was trying to quickly explain to her how to do it. I finally decided I would just put the tutorial here for anyone interested. They are super easy and cute. I can put one together in under 30 minutes. Most of the items you will need you probably already have on hand. So lets get started.
You will need
2 coordinating fabrics (enough to cover each side of a travel wipes case)
1 coordinating piece of ribbon (approx 9")
batting
gimp trim (found in the fabric department)
hot glue gun
embellishment (optl)
I've got to warn you, I did take pictures for you but they were done at night and while I was watching a movie and visiting with my sister-in-law so they aren't the best quality. But you'll get the idea, I hope.
Start by tracing your wipes case onto your fabric. You will need two pieces so you can either do both in the same fabric or one of each of coordinating fabrics (which I think is the cutest). Then cut them out. Trace again on your batting and cut out TWO pieces of batting.
Glue your batting, one piece to each side, with a little hot glue.
Now start gluing your fabric on by putting a little hot glue on one end and then go to the opposite end and pull tightly and glue down the opposite side. If your fabric goes over the center line of the case (where it closes) trim the excess fabric off. Once you have all four sides glued down repeat on the other side.
Add a piece of ribbon across the center by gluing down one end (matching it up to the line where the case closes). The slowly glue down the ribbon across the case and to the other side.
Now that your ribbon is on you want to add your gimp to cover up the raw edges and make everything look pretty. Go slowly and do small sections at a time. I start in the center of the back so that my two ends meet in the back and the front looks nice and pretty. Do one side and then the other. Now open your case and make sure it's not stuck together! :)
You can be done here or you can go a little further and add an embellishment. For the girls I use a small version of my fabric flower and adhere with a lot of hot glue.
For this case (which I'm giving to someone who had a boy) I added buttons from my button collection. And now you are done. Throw this in with a package of diapers or wipes and it makes a perfect baby shower gift.


1 comment:
I've actually never made one of these, but I need a baby shower gift for next week and it will be perfect. I contemplated a pacifier clip, but I think diapers and wipes are more practical.
Post a Comment