A couple weeks ago, after much debating, I finally started Laila on solids. I started off with rice cereal, but she gagged on every bite, so I bought a few little jars of baby food, and sweet potatoes were a big hit! After she finished off the first jar I just couldn't throw it away because it was so tiny and cute. I knew there had to be something I could do with it. It only took about 30 seconds. With Valentines day coming up, I decided that heart sugar cookies with some frosting and homemade sprinkles would be a perfect gift to give to the kid's teachers. I don't really do anything for Christmas since it's such a crazy time of year, so I try to make up for it on Valentines day.
Most baby food jars are kind of short and squatty, but the Earth's Best brand are a little taller and thinner. Perfect for sprinkle jars. They cost a little more than the Gerber ones, but are still only around fifty cents a jar, so they won't break the bank.
I did some searching online for sprinkle recipes, but most people had you pipe out the frosting in long tubes and then cut them up into rectangles and it just wasn't very cute. Then, I found this recipe and it was exactly what I was looking for. One thing I should mention though is that these need to sit out over night to dry so don't expect to whip them up and use them right away.
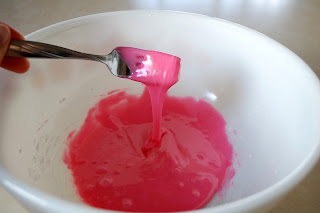
Start by combining 1 cup of powdered sugar with 1 Tablespoons of milk and 1 Tablespoon of corn syrup. Next add a few drops of food coloring and 1/4 - 1/2 tsp of Lemon extract or whatever flavor you want. I happen to think that lemon goes the best with sugar cookies and isn't overwhelming.
It should look like this. You want this to be pretty thick so it doesn't run all over the wax paper. If you need to, you can add another teaspoon of milk, but you really shouldn't need more than that.
You can either put the sugar mixture into a pastry bag or just a regular zip lock bag like I did and cut a small hole in the corner, and then squeeze out your sprinkles onto wax paper. One small word of caution. Making the sprinkles too small will take you forever! And only fill up one jar! Trust me, my first round were tiny. However, making them too big means they will take a long time to dry. It's hard to say what the perfect size is, but if it's taking a long time and seems really tedious, that's probably a good indication that you need to cut your hole just a little bit bigger.
Once I had all my dots drying I set to work cleaning up my little jars. I found that orange oil worked really well to get off that little bit off glue left behind once the label was peeled off and it also took off the date that had been stamped on the glass.
I also spray painted the lids white, but you can see in the picture that the dates that were stamped on the lids still showed through so I put white glitter on them as well. If you are like my Aunt Maria though and refuse to even have glitter in your house than I would suggest trying a darker color of spray paint. I didn't think black would look very nice for Valentines day though.
After the lids were all glittered, the only thing left to do was to add a few quick embellishments to the jars and they are ready to be taken to school.
For the red sprinkles I just did your basic add food coloring to sugar, except I used In The Raw Sugar since the crystals are larger.
Easy, cute, and very inexpensive!


3 comments:
Very cute. I'd never thought of making my own sprinkles before.
But to clarify, I HAVE glitter in my house. I just don't USE glitter in my house. :) Ha ha.
I love them! They look so cute and are a perfect gift for the teachers!!
Wow Sally, you amaze me with your ideas.
Post a Comment